Desktop Command Line
Please Note
The following process is for running a Minima node manually. You must leave your desktop running at all times for Minima to continue running and must update your node manually when new versions become available.
Start a new Minima node
Before starting, ensure you have the latest version of Java installed from https://java.com/en/
Download and save the latest minima.jar file from Github here
Open your command line interface
Windows: Click on Start, search for command prompt then right click to Open as administrator
Mac: Open the Terminal app from the Utilities folder in ApplicationsType the following command all on one line, replacing
INSERTUSERNAMEwith the username for your files:
Tip: To avoid typing in the folder path, you can drag and drop the downloaded minima.jar file into the command line window.
Windows
java -jar C:\Users\INSERTUSERNAME\Downloads\minima.jar -mdsenable -mdspassword [insertpasswordhere]
Mac
sudo java -jar /Users/INSERTUSERNAME/Downloads/minima.jar -mdsenable -mdspassword [insertpasswordhere]
Linux
sudo java -jar /home/INSERTUSERNAME/minima.jar -mdsenable -mdspassword [insertpasswordhere]
Optional start up parameters
Expand to see full list of start up parameters
The following start up parameters can optionally be specified when starting your node.
To add/remove parameters after a node has been started, you must quit the node and restart it, adding/removing the required parameters.
[] square brackets indicate where an input is required, the brackets should not be included.
General
-clean: CAREFUL! Clears existing data, starts a new fresh node. All coins will be lost.-port [port]: specify the initial port for Minima to use. Range used will be the specified port +4. Default is 9001-9005.-host [ipaddress]: specify the host IP-dbpassword [yourdbpassword]: Main Wallet / SQL AES password - MUST be specified on first launch. CANNOT be changed later.-allowallip: Allow all IPs for Maxima / Networking. Local IPs won't be allowed otherwise.-archive: Run an Archive node - store all archive data / the cascade to allow for resyncs from this node-daemon: Run in daemon mode with no stdin input (if running Minima as a background service)-isclient: Tells the P2P System that this node can't accept incoming connections-server: Use Server settings - this node can accept incoming connections-desktop: Use Desktop settings - this node can't accept incoming connections
Folders
-data [foldername/path]: the data folder where all the config files for this node are stored. Default is a hidden .minima folder under the user's home directory. If you want to specify a folder not in the user's home directory, you must use the complete path.-basefolder [foldername/path]: specify a default file creation / backup / restore folder. Default is the user's home directory. Can be the same as thedatafolder provided.
MiniDapp System (mds)
-mdsenable: enable the MiniDapp System (default port 9003)-mdspassword [yourmdspassword]: specify the mds login password-mdsinit [foldername/path]: specify a folder of miniDAPPs-mdswrite [minidapp]: give an initial miniDAPP WRITE access
RPC
-rpcenable: enable remote procedure call-rpcssl: use Self Signed SSL cert to run RPC-rpcpassword [yourrpcpassword]: set Basic Auth password for RPC calls ( Use with SSL / stunnel ). Only secure if used with SSL.-rpcclrf: use CRLF at the end of the RPC headers (NodeJS)
Test nodes
-genesis: start the node from the genesis block (automatically uses -clean)-test: uses test parameters e.g. faster block times-connect [ip:port,ip:port]: Disable the automatic P2P system and create your own network by manually connecting to this list of host:port-nop2p: Disable the automatic P2P system-noconnect: Stops the P2P system from connecting to other nodes until it has been connected to-nosyncibd: Do not sync IBD (for testing)
Mobile
-mobile: Sets this device to a mobile device - used for metrics only-limitbandwidth: Limit the amount sent for archive sync-noshutdownhook: Do not use the shutdown hook (Android)
Debugging
-p2p-log-level-info: Set the P2P log level to info-p2p-log-level-debug: Set the P2P log level to debug
Help
-showparams: Show relevant startup params on launch-help: print help for the start up parameters
Hit the Enter key
Avoid
- Closing the Command Prompt/Terminal
- Allowing your PC to go to sleep
- Turning your PC off
If any of the above happen, your Minima node will stop running and you will need to repeat step 3 to start it again.
Minima is now started, your output should look similar to the below and you should start to see the logs running.
Minima @ 14/03/2022 17:32:30 [5.1 MB] : **********************************************
Minima @ 14/03/2022 17:32:30 [5.1 MB] : *  __  __  ____  _  _  ____  __  __    __    *
Minima @ 14/03/2022 17:32:30 [5.1 MB] : * (  \/  )(_  _)( \( )(_  _)(  \/  )  /__\   *
Minima @ 14/03/2022 17:32:30 [5.1 MB] : *  )    (  _)(_  )  (  _)(_  )    (  /(__)\  *
Minima @ 14/03/2022 17:32:30 [5.1 MB] : * (_/\/\_)(____)(_)\_)(____)(_/\/\_)(__)(__) *
Minima @ 14/03/2022 17:32:30 [5.1 MB] : *                                            *
Minima @ 14/03/2022 17:32:30 [5.1 MB] : **********************************************
Congratulations - your node is now installed & running!
You can type status to show the status of your Minima node, or help to show the full list of commands.
Secure your node
Before using your node for the first time, you must:
- Write down your Seed Phrase
- Take a backup
- Lock your wallet (optional)
Please visit the User guides section to learn how.
Login to your node
The first time accessing your MiniDapp hub, you may need to pass through the security warning - see below - as the MiniDapp system currently uses self-signed certificates.
custom ports
Note that 9003 is the default port for accessing your MiniDapp system - if you installed Minima on custom ports, you will need to use your custom base port + 2. E.g. If you installed Minima on 8001, you will need to use https://127.0.0.1:8003/
Go to https://127.0.0.1:9003/ in your web browser. You may have to proceed past the security warning, since Minima uses self-signed certificates. Learn how here.
You will see the login page to your node.

- If you set one, use the password you set as your
-mdspasswordwhen starting the node. To check your password you can return to your desktop command line/terminal where the Minima logs are running and enter
mds
You should see an output similar to below:
mds
{
  "command":"mds",
  "status":true,
  "response":{
    "password":"1SV0-F0WN-K367",
    "minidapps":[]
  }
}
- Copy and Paste your password into the field and click Enter
- You will see your MiniDapp hub!
Please see the first steps to complete now your node is running.
First steps
The first time you install Minima, you must
- Connect to the network
- Write down your seed phrase
Please refer to the user guides to learn how.
Using the MiniDapp hub
By default, all MiniDapps will be given READ permission when you install them.
When a MiniDapp with READ permission attempts to run a command which would make changes to your node or require access to your funds, a PENDING command will be created which you will need to accept.
warning
You should only give WRITE permissions to MiniDapps that you trust.
Only the Terminal MiniDapp will need WRITE permission so you can approve/deny transactions.
Setting the Terminal permissions to WRITE
- Login to your MiniDapp hub and install the Terminal MiniDapp from the MiniDapp site.
- Return to your desktop command line/terminal and run the
mdscommand again (see above) to list your MiniDapps and check their existing permissions - You will see the Terminal MiniDapp listed, copy the uid from YOUR node
    {
      "uid":"0xB4C47D4AD267C3D2D4EF6E086FD12845",
      "conf":{
        "name":"Terminal",
        "icon":"terminal.png",
        "version":"1.91",
        "description":"Terminal CLI for Minima",
        "permission":"write",
        "browser":"internal"
      }
    },
- Run the following command in the Command line/Terminal where the Minima logs are running, pasting in YOUR uid:
Windows/Mac/Linux Desktop
mds action:permission uid:0x02FA22EF2A2A3B0FA01D688A902779E5 trust:write
You may now use the Terminal MiniDapp to execute all commands - you will no longer need to use your desktop command line interface/Terminal.
How to check the Status of your node
You can use the Terminal MiniDapp to interact with your node, for example to check your node version, status, balance, password, Incentive Program setup or to create a backup.
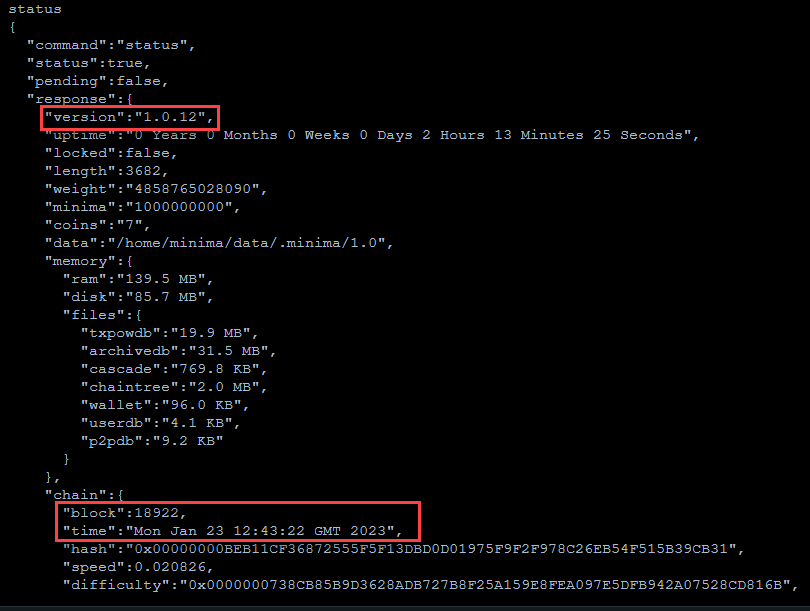
The status command will show details of your node including version, last block and chain details.
- Type
statusinto the command line/Terminal. - Check
blockandtime, this is your tip block and the time of that block,timeshould be within a few minutes of the current time.
checking your node is in sync
Having a recent block time is not a guarantee that you are on the right chain.
Consider cross checking your latest block with another node or checking the samechain response of your Maxima Contacts by running the maxcontacts command.
If the time shown is significantly behind, you should restart your node to resync to the chain. If it doesn't catch up automatically, youu may need to perform a chain resync from an Archive node.
Other useful commands:
mds - find the password for your node
help - show all commands
How to update your node
- Type quit into the Command prompt/Terminal window where the Minima logs are running
- Download and save the latest minima.jar file from Github here.
- Replace your existing minima.jar file with the latest version
- Restart Minima using the command in step 3 in Start a new Minima node.
Starting a Clean node
To create a fresh install of a node -clean can be added on to the end of the start up command
DO NOT use -clean if you are simply restarting your node, your coins will be wiped and you will only be able to recover them from a backup!
e.g. java -jar C:\Users\Username\Downloads\minima.jar -mdsenable -clean
How to remove your node
important
Removing a node without taking a backup will delete all your coins! Only remove a node if you have taken a backup or are running a test node.
- Type quit into the Command prompt/Terminal window where the Minima logs are running
- Delete the minima.jar file you downloaded
- (Optional) Remove the minima database files located in your home directory (you may need to show hidden files)
Next Steps
Once your node running, you will need to join the network.